In this article you’ll learn how to install Python and setting up Visual Studio Code (VS Code), a popular and powerful code editor, to kickstart your coding journey. You would also run your very first Python program. These are the following topics you will be covering:
- How a Python Interpreter Works
- Steps to install a Python Interpreter
- Troubleshooting
- Steps to install VS Code
- Running your first Python Program in VS Code
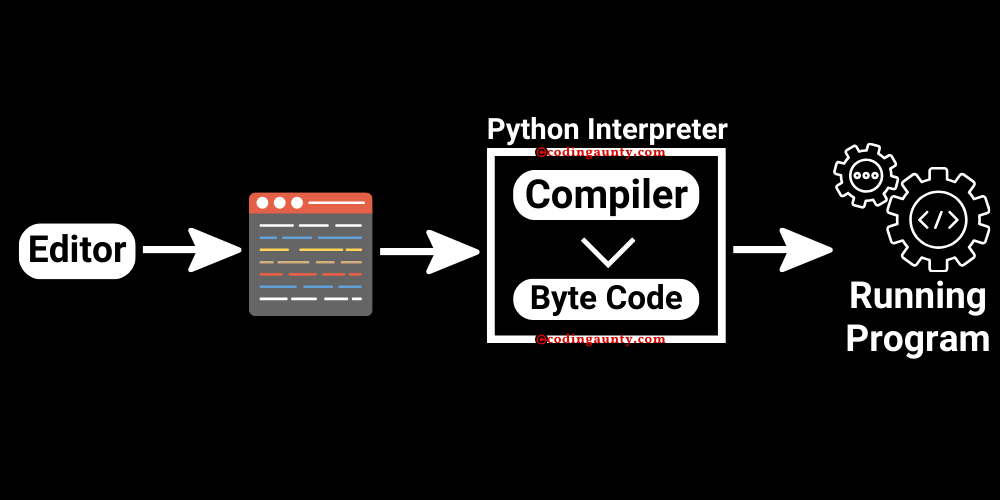
How a Python Interpreter Works
Installing a Python interpreter is crucial for writing, running, and executing Python code on your computer. The Python interpreter is the engine that interprets and executes your Python scripts or programs.
Think of your source code (the code you type) as a detailed instruction manual you wrote in your native language. It’s comprehensive and easy for you to understand, just like the human-readable source code you write in Python.
Now, imagine you have a friend who understands your language but needs instructions in a simpler, intermediary language. You decide to manually transcribe your detailed instructions into a simplified, universal language that your friend can easily follow. This simplified language is like bytecode in Python.
The simplified instructions (bytecode) are now a condensed version of your original instructions. They are still somewhat human-readable but designed for universal understanding. In Python, this bytecode is a lower-level representation of your source code.
You hand over the simplified instructions (bytecode) to your friend, who is equipped with an interpreter specific to this simplified language. This interpreter is your friend’s Python Virtual Machine (PVM). The PVM is like a friend who can understand and execute the simplified instructions (bytecode). It’s tailored to comprehend this specific language and can bring your instructions to life. In Python, the PVM is responsible for executing bytecode.
Your friend’s interpreter (PVM) reads and executes the simplified instructions (bytecode). It performs the tasks outlined in your original instructions. The actual execution of these tasks, whether calculations, data manipulation, or other actions, happens at this stage. Your friend provides feedback on the accomplished tasks, just as the PVM generates output based on the execution of bytecode. This output might be displayed on the screen, saved to a file, or used for further processing.
Terminology:
- Source Code (Human-Readable Instructions):
Source code is like a set of human-readable instructions you write to tell the computer what to do. It’s written in a way that makes sense to you but needs translation for the computer to understand.
- Translation to Bytecode (Intermediary Language):
Before your source code can be directly executed, it goes through a translation process. This process involves converting your source code into a simplified, machine-independent language called bytecode. Bytecode is like a universal set of instructions that can be understood by any machine, acting as an intermediary step.
- Bytecode (Low-Level, Machine-Independent Instructions):
Bytecode is a lower-level representation of your source code. It’s not as human-readable as your original instructions but is closer to what the computer’s processor can understand. It’s compact, efficient, and ready for execution by a Python Virtual Machine (PVM).
- Installation of Python Interpreter (PVM):
The Python interpreter, or PVM, is the key component that understands and executes bytecode. Installing the Python interpreter on your system provides the environment necessary to run Python programs. The interpreter serves as the bridge between the bytecode and the computer’s hardware.
- Execution by PVM (Task Accomplishment):
With the Python interpreter in place, the PVM reads and executes the bytecode. It performs the actual tasks outlined in your source code—calculations, data manipulations, or any other actions you’ve programmed.
Steps to install a Python Interpreter
The steps to install the Python interpreter vary slightly depending on your operating system. Here are the general steps for Windows, macOS, and Linux:
For Windows:
- Visit the Python Official Website.
- Download Python: Click on the “Downloads” tab, and you’ll see the latest version of Python. Click on it to access the download page.
- Run the Installer: Once the installer is downloaded, run the executable file (usually named something like python-3.x.x.exe where x.x is the version number).
- Configure Installation: During the installation process, make sure to check the box that says “Add Python to PATH.” This is important for allowing you to run Python from the command line.
- Install Now: Click on the “Install Now” button and let the installer do its work.
- Verify Installation: Open a command prompt and type
python --versionorpython -Vto verify that Python is installed. You should see the version number.
For macOS:
- Install Homebrew (Optional): If you prefer using Homebrew, you can install it by following the instructions on the Homebrew website.
- Open Terminal: Open the Terminal application.
- Install Python: If you’re using Homebrew, you can install Python with the command:
brew install python
If not using Homebrew, you can download the macOS installer from the official Python website.
- Verify Installation: In the Terminal, type
python3 --versionto verify the installation.
For Linux (Ubuntu/Debian as an example):
- Open Terminal: Open a terminal window.
- Update Package List: Run the following commands to update the package list
sudo apt-get update
- Install Python: Install Python using the following command
sudo apt-get install python3
- Verify Installation: In the terminal, type
python3 --versionto verify the installation.
Troubleshooting
If the after the installation process, verifying installation fails maybe the environmental variables aren’t set up properly. On some systems, you might need to set up environmental variables manually. This step is usually handled automatically, but it’s good to check. It can make it easier to run Python and associated tools from any command prompt or terminal window.
Here are the steps to set up environmental variables on different operating systems:
For Windows:
- Find the Python Installation Path: Locate the folder where Python is installed. By default, it’s in
C:\Users\YourUsername\AppData\Local\Programs\Python\Python3x, where “YourUsername” is your Windows username, and “3x” is the Python version.
- Copy the Python Path: Copy the path to the Python installation folder.
- Open System Properties: Right-click on “This PC” or “Computer” on your desktop or in File Explorer, and select “Properties.”
- Open Advanced System Settings: Click on “Advanced system settings” on the left.
- Open Environment Variables: Click on the “Environment Variables…” button.
- Edit the Path Variable: In the “System variables” section, scroll down and select the “Path” variable. Click “Edit…”
- Add Python Path: Click “New” and paste the path to the Python installation folder.
- Verify Configuration: Open a new command prompt and type python –version or python -V to ensure Python is accessible from any directory.
For macOS and Linux:
- Open Terminal: Open a terminal window.
- Edit the Bash Profile or Bashrc File: Depending on your system, you’ll edit either
~/.bash_profile,~/.bashrc,~/.zshrc, or another configuration file. You can use a text editor likenanoorvim. For example:
nano ~/.bash_profile
- Add Python Path:
Add the following line at the end of the file, replacing /path/to/python with the actual path to your Python installation:
export PATH="/path/to/python/bin:$PATH"
- Save and Exit: Save the file and exit the text editor.
- Reload the Configuration: In the terminal, type either source
~/.bash_profileorsource ~/.bashrcto apply the changes.
- Verify Configuration: Type
python3 --versionto ensure Python is accessible from any directory.
Remember to replace /path/to/python with the actual path where Python is installed.
After completing these steps, you should be able to run Python and related tools from any command prompt or terminal window, regardless of your current working directory.
Steps to install VS Code
Here are the steps for installing VS Code on Windows, macOS, and Linux:
For Windows:
- Download VS Code: Visit the official VS Code website. Click on the “Download for Windows” button.
- Run the Installer: Once the installer is downloaded, run the executable file (usually named something like
VSCodeSetup-x64-x.x.x.exe, wherex.x.xis the version number).
- Follow Installation Wizard: Follow the on-screen instructions in the installation wizard. You can choose the default options or customize the installation as needed.
- Launch VS Code: After the installation is complete, launch VS Code. You can find it in the Start menu or on your desktop.
For macOS:
- Download VS Code: Visit the official VS Code website. Click on the
Download for Macbutton.
- Open the DMG File: Once the download is complete, open the DMG file (usually named something like
VSCode-darwin-stable.zip).
- Drag VS Code to Applications: Drag the Visual Studio Code icon to the Applications folder.
- Launch VS Code: Open the Applications folder and double-click on Visual Studio Code to launch it.
For Linux:
OPTION 1 : Using Package Manager
- Open Terminal
- Update Package List: Run the following commands to update the package list
sudo apt-get update
- Install VS Code: Install VS Code using the following command for Ubuntu/Debian-based systems
sudo apt-get install code
OPTION 2 : Using Direct Download
- Download VS Code: Visit the official VS Code website.
- Click on the
Download for Linux button.
- Open the DEB or RPM Package: Once the download is complete, open the downloaded DEB or RPM package (depending on your distribution).
- Install VS Code: Follow the instructions provided for your package manager to install VS Code.
Running your first Python Program in VS Code
Here’s a step-by-step guide to running your first Python program in Visual Studio Code (VS Code):
Step 1: Open VS Code
Open Visual Studio Code on your computer. If you’ve just installed it, you can find it in the Start menu (Windows), Applications folder (macOS), or use the command you usually use to launch applications (Linux).
Step 2: Create a Python File
Click on “File” in the menu bar. Select “New File” to create a new, empty file.
Save the file with a .py extension. For example, you can name it hello.py.
Step 3: Write Your First Python Code
In the newly created file, write a simple Python program. For example:
print("Hello, Python!")
Step 4: Save the File
Make sure to save your file after writing the code. You can do this by clicking on “File” and then “Save” or using the shortcut Ctrl + S (Windows/Linux) or Cmd + S (macOS).
Step 5: Open the Integrated Terminal
Click on “View” in the menu bar. Select “Terminal” to open the integrated terminal at the bottom of the VS Code window.
Step 6: Run the Python Program
In the integrated terminal:
- Ensure that the terminal is set to the directory where your Python file is located. You can use the
cdcommand to navigate to the correct directory.
cd path/to/your/file
- Run your Python program using the
pythoncommand followed by the name of your Python file.
python hello.py
After running the command, you should see the output of your Python program in the terminal.
Hello, Python!
Congratulations! You’ve successfully run your first Python program in Visual Studio Code.
Follow along this guide to learn more about Python!
Happy Coding!